VR Input은 컨트롤러 입력이 많은 만큼 InputAction도 많지만 IMC로 많다. 상황에 맞는 IMC를 선택해주는 PMI_VRTemplate가 필요하다 우선순위를 지정해주는것 같다.

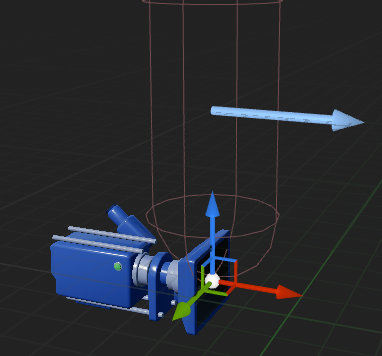
결론부터 말하면 VR은 HMD가 최상위로 그 밑에 카메라및 VR컴포넌트를 붙여야한다. 그리고 최상위 RootComponent인 CapsuleComponent가 HDM를 따라가게 위치와 사이즈를 조정해야 한다. 그리고 HMD의 위치는 최초 설정시 바닥에 놓고 높이를 초기화하기때문에 카메라의 위치는 0,0으로 설정해야 한다.
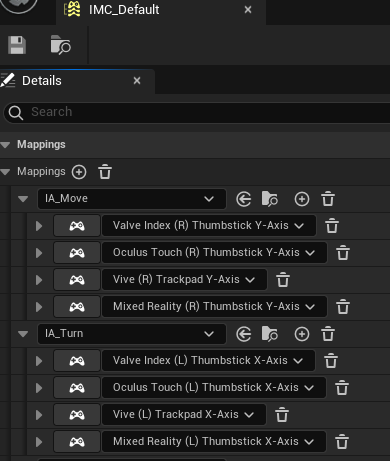
그리고 IMC 맵핑할때 키보드, 마우스, Oculus입력장치가 많으므로 이걸 잘 처리하지 않으면 엄청 많은 바인딩을 해야한다. EnhancedInput은 IMC에서 맵핑할때 IA_Move아래 Move와 관련된 다차원의 입력들을 하나로 묶어줘 편리하다. WASD키는 1차원이지만 같이 묶을수 있다. 기본적으로 XYZ Vector값이라 Modify해서 하나의 Vector로 맞출수 있다.


VRCharacter.h
// Fill out your copyright notice in the Description page of Project Settings.

#pragma once

#include "CoreMinimal.h"
#include "GameFramework/Character.h"
#include "InputAction.h"
#include "VRCharacter.generated.h"


UCLASS()
class SESACVR_API AVRCharacter : public ACharacter
{
	GENERATED_BODY()

public:
	// Sets default values for this character's properties
	AVRCharacter();

protected:
	// Called when the game starts or when spawned
	virtual void BeginPlay() override;

	UPROPERTY(EditAnywhere, Category = "Controller")
	class UMotionControllerComponent* LeftController;

	UPROPERTY(EditAnywhere, Category = "Controller")
	class UMotionControllerComponent* RightController;

	UPROPERTY(EditAnywhere, Category = "Input")
	class UInputMappingContext* PlayerMappingContext;

	UPROPERTY(EditAnywhere, BlueprintReadWrite ,Category = "HMD")
	class UCameraComponent* CameraComp;

	UPROPERTY(EditAnywhere, BlueprintReadWrite, Category = "HMD")
	class USceneComponent* VROrigin;

protected:

	 UPROPERTY(EditAnywhere, Category = "Input")
	 class UInputAction* IA_LeftThumbstick;
	 UPROPERTY(EditAnywhere, Category = "Input")
	 class UInputAction* IA_LeftTrigger;
	 UPROPERTY(EditAnywhere, Category = "Input")
	 class UInputAction* IA_RightThumbstick;

public:
	// Called every frame
	virtual void Tick(float DeltaTime) override;

	// Called to bind functionality to input
	virtual void SetupPlayerInputComponent(class UInputComponent* PlayerInputComponent) override;

	UFUNCTION()
	void Func1(const FInputActionValue& Value);
	UFUNCTION()
	void Func2(const FInputActionValue& Value);
	UFUNCTION()
	void Func3(const FInputActionValue& Value);

};
VRChracter.cpp
// Fill out your copyright notice in the Description page of Project Settings.


#include "VRCharacter.h"
#include "MotionControllerComponent.h"
#include "Camera/CameraComponent.h"
#include "Components/CapsuleComponent.h"
#include "EnhancedInputSubsystems.h"
#include "EnhancedInputComponent.h"
#include "Components/SceneComponent.h"
#include "Components/ArrowComponent.h"

// Sets default values
AVRCharacter::AVRCharacter()
{
 	// Set this character to call Tick() every frame.  You can turn this off to improve performance if you don't need it.
	PrimaryActorTick.bCanEverTick = true;


	SetRootComponent(GetCapsuleComponent());
	//GetCapsuleComponent()->SetCapsuleSize(1.f, 1.f);

	GetMesh()->SetupAttachment(RootComponent);
	GetArrowComponent()->SetupAttachment(RootComponent);


	VROrigin = CreateDefaultSubobject<USceneComponent>(TEXT("VROrigin"));
	VROrigin->SetupAttachment(RootComponent);

	LeftController = CreateDefaultSubobject<UMotionControllerComponent>(TEXT("LeftCon"));
	LeftController->MotionSource = FName("Left");
	LeftController->SetupAttachment(VROrigin);

	RightController = CreateDefaultSubobject<UMotionControllerComponent>(TEXT("RightCon"));
	RightController->MotionSource = FName("Right");
	RightController->SetupAttachment(VROrigin);


	CameraComp = CreateDefaultSubobject<UCameraComponent>(TEXT("HMD"));
	CameraComp->SetupAttachment(VROrigin);
}

// Called when the game starts or when spawned
void AVRCharacter::BeginPlay()
{
	Super::BeginPlay();

	if (APlayerController* PlayerController = Cast<APlayerController>(GetController()))
	{
		if (UEnhancedInputLocalPlayerSubsystem* Subsystem
			= ULocalPlayer::GetSubsystem<UEnhancedInputLocalPlayerSubsystem>(PlayerController->GetLocalPlayer()))
		{
			Subsystem->AddMappingContext(PlayerMappingContext, 0);
		}
	}
}

// Called every frame
void AVRCharacter::Tick(float DeltaTime)
{
	Super::Tick(DeltaTime);
}

// Called to bind functionality to input
void AVRCharacter::SetupPlayerInputComponent(UInputComponent* PlayerInputComponent)
{
	Super::SetupPlayerInputComponent(PlayerInputComponent);

	if (UEnhancedInputComponent* EnhancedInputComponent = CastChecked<UEnhancedInputComponent>(PlayerInputComponent))
	{
		//EnhancedInputComponent->BindAction(IA_LeftThumbstick, ETriggerEvent::Triggered, this, &AVRCharacter::Func1);
		//EnhancedInputComponent->BindAction(IA_LeftTrigger, ETriggerEvent::Triggered, this, &AVRCharacter::Func2);
		//EnhancedInputComponent->BindAction(IA_RightThumbstick, ETriggerEvent::Triggered, this, &AVRCharacter::Func3);
	}
}

void AVRCharacter::Func1(const FInputActionValue& Value)
{
	GEngine->AddOnScreenDebugMessage(-1, 5.0f, FColor::Green, TEXT("LeftThumbstick"));
}

void AVRCharacter::Func2(const FInputActionValue& Value)
{
	GEngine->AddOnScreenDebugMessage(-1, 5.0f, FColor::Green, TEXT("LeftTrigger"));
}

void AVRCharacter::Func3(const FInputActionValue& Value)
{
	GEngine->AddOnScreenDebugMessage(-1, 5.0f, FColor::Green, TEXT("RightThumbstick"));
}
움직임을 C++로 짤수 있지만 Movement를 우선 블루프린트로 세션부터 만들어 보자.
콘텐츠 드로어를 누릅니다.
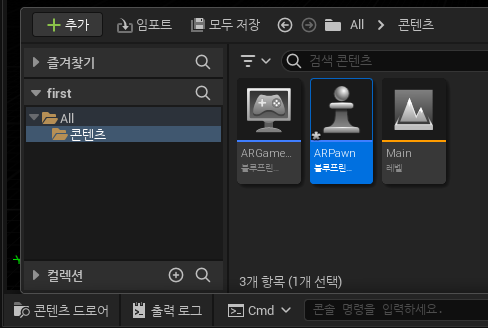
추가 -> 기타 -> 데이터 에셋을 누릅니다.

화면이 나타나면 검색창에 ARSession을 검색하여 ARSessionConfig를 선택합니다.
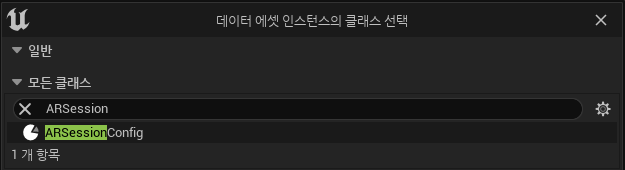
네이밍은 ARSessionConfig로 지정합니다.

ARPawn을 더블 클릭해서 열어줍니다.

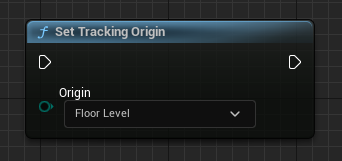
이 상태에서 우클릭을 합니다. 아래와 같이 검색하여 Set Tracking Origin을 누릅니다.

누르면 아래와 같은 녀석이 하나 생성됩니다.
다시 우클릭 해서 Start AR Session을 추가합니다.

Start AR Session의 Session Config를 ARSessionConfig로 설정합니다.
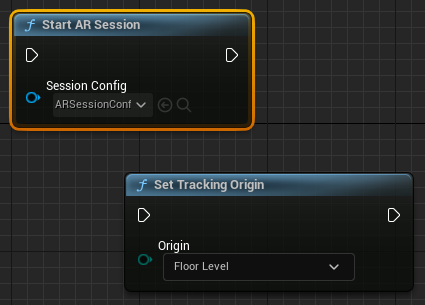
BeginPlay 이벤트와 Set Tracking Origin을 연결합니다.

Set Tracking Origin과 Start AR Session을 연결합니다.

다음으로 Stop AR Session을 생성합니다.

그리고 Event End Play를 생성합니다.

Event End Play와 Stop AR Session을 연결합니다.
최종적으로 아래와 같은 구성이 됩니다.


썸스틱으로 부터 Y축 X축을 입력 받아 AddMovementInput 노드에 입력하는것으로 끝난다.

다음은 회전이다. VR에서 회전은 보통 오른쪽 썸스틱을 사용한다. Z축 데이터만 사용해서 AddActorWorldRotation을 해주면 된다.

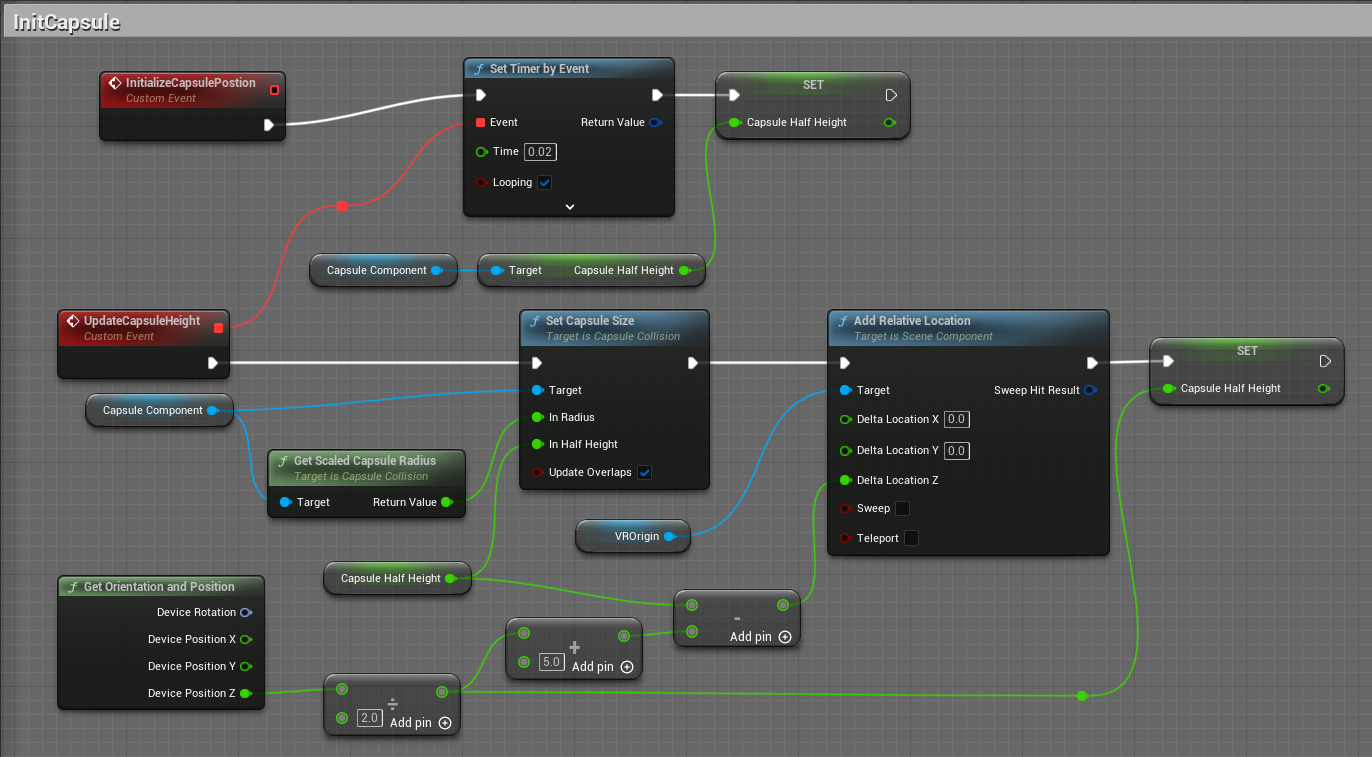
다음은 캡슐의 위치를 초기화하는 로직이다.
복잡하니 3단계로 나누어 보겠다. 우선 CapsulePosition이 초기화된후 0.02초마다 UpdateCapsuleHeight를 호출한다.

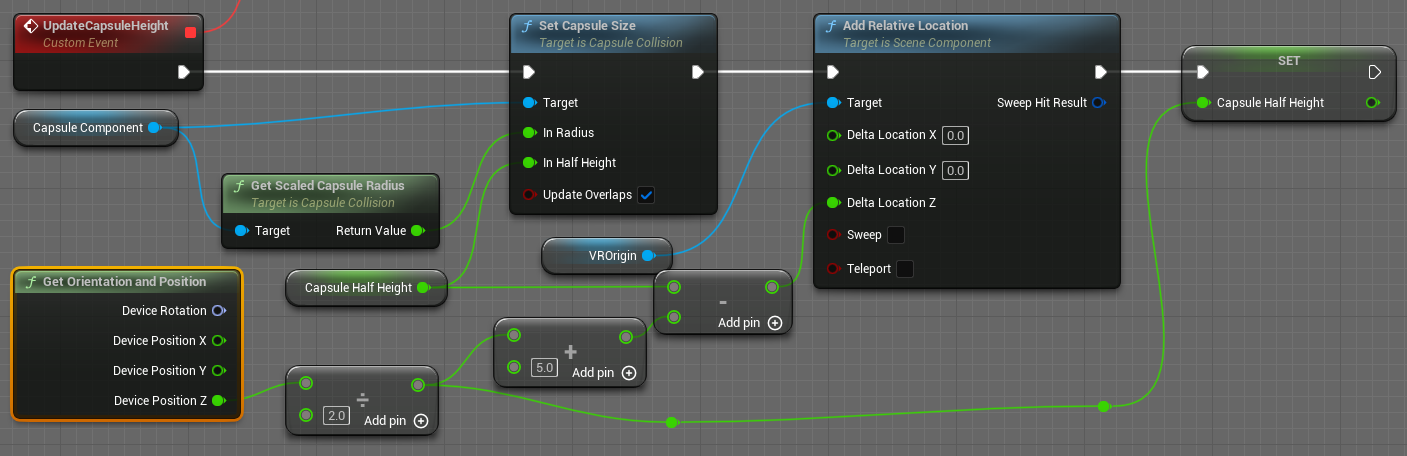
UpdateCapsuleHeight는 다음을 실행한다. 일단 Capsule의 값을 불러 다시저장하는데 Capsule Half Height가 float변수이다. 이게 나중에 다시 설정된다.

HMD의 방향과 포지션을 얻어와

Z값 높이를 반으로 나누고 5를 더해준후 Capsule Half Height에서 빼준다.? 무조건 마이너스 같은데 이상하다.
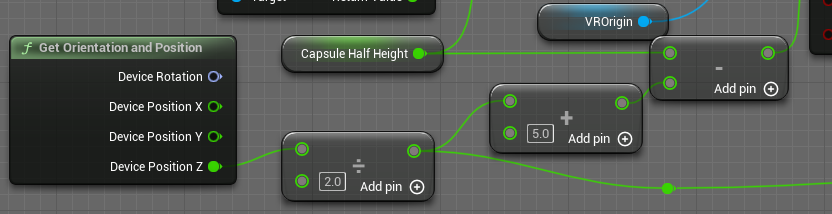
빼준값은 VR Origin의 새로운 높값으로 설정된다.

HMD의 높이를 반으로 나눈값은 Capsule의 Half Height가 되고 다음 루프에서 Capsule사이즈를 결정한다.


UpdateCapsuleHeight의 전체 노드이다. 결론은 변화하는 VROrigin의 높이값에 맞춰 CapsuleSize를 계속 변경해준면서 VROrigin은 relative Z position이 -5~0사이를 떤다. 왜그런지는 모르겠다.
전체 노드이다. InitCapsule인데 SetTime가 언제 탈출하는지는 모르겠다.
만일 CapsulePosition이 바뀌면 다음 로직이 변경된다.
카메라컴포넌트와 캡슐컴포넌트의 위치차를 액터에 더해주고 VROrigin에 반대로 빼준다.

'언리얼수업 > 언리얼' 카테고리의 다른 글
| 231220 VR수업 (0) | 2023.12.20 |
|---|---|
| VR수업 VRPawn 이용하기 (0) | 2023.12.19 |
| 231218 VRPawn 복제 안움직이는 이 (0) | 2023.12.18 |
| VRPawn 따라하기 (1) | 2023.12.18 |
| 231218 VR수업 (0) | 2023.12.18 |


